Work Smarter Not Harder
New To macOS?
This is a great article by Apple that uses Windows terms and explains what they’re called in macOS and how to find them.
Duke Unlock

Universal Control
Control both your Mac and your iPad with a single keyboard and mouse or trackpad. Move your cursor fluidly between them and create like never before using the power of both devices.
On Mac
- Launch System Preferences from your Mac's Dock, from the Applications folder, or from the Apple menu bar ( -> System Preferences...)
- Select Displays in the preferences panel.
- Click Universal Control.
- Click the checkboxes to enable the following Universal Control features (the first is enabled by default): Allow your cursor and keyboard to move between any nearby Mac or iPad, Push through the edge of a display to connect a nearby Mac or iPad, and Automatically reconnect to any nearby Mac or iPad.
- Click Done.
- Next, click Add Display.
- In the dropdown that appears, you'll see any nearby devices signed into the same Apple ID as your Mac. Click a device listed under "Link Keyboard and Mouse" to use it in Universal Control mode.
On iPad
- Launch the Settings app on your iPad.
- Tap General in the sidebar.
- Tap AirPlay & Handoff in the menu window.
- Toggle on the switch next to Cursor and Keyboard
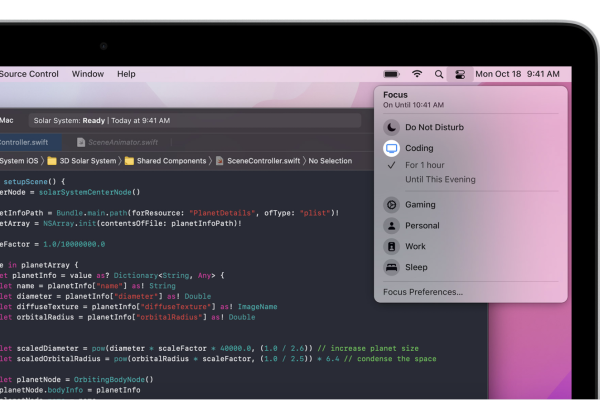
Focus
Focus helps you stay in the moment when you need to concentrate or step away. Choose a Focus that only allows the notifications you want — you can get work done while you’re in the zone, or enjoy a distraction-free dinner. Pick from a list of suggested Focus options or create your own.
- Open the Settings app and select Focus.
- If you want to share and sync your Focuses to all of your devices, make sure “Share Across Devices” is enabled.
- Tap the “+” button in the top-right corner to create/add a new focus.
- Choose an existing template or create a custom focus.
- When adding a focus you choose a name, color, and symbol to identify it.
- Afterward, choose any people you want to allow notifications from (your iPhone may make a few default suggestions).
- In addition to notifications, you can also configure which calls are allowed. If you don’t want to allow any calls or notifications from people, simply tap “Allow None.”
- After choosing which people can contact you, you’ll be asked which apps you want to receive notifications from. Again, there may be some default suggestions, you can remove them or add to them.
- Enabling “Time Sensitive” notifications allows certain apps (such as security or health reminders) to notify you of important things even when you’re in this focus mode.

Live Text
Live Text intelligently unlocks rich and useful information in images, so you can make a call, send an email, or look up directions with just a tap on the highlighted text in a photo.
1. Make sure Live Text is enabled by going into Settings > Camera > Live Text
2. Open the Camera app
3. Point the Camera at text
4. Tap the "Live Text" icon (located at the bottom right corner of the frame)
5. Choose your action (i.e Copy, Select All, or Look Up)
Copy on one device. Paste on another.
Copy images, video, or text from an app on your iPhone or iPad. Then paste into another app on your nearby Mac — or vice versa. There are no extra steps. Just copy and paste as you normally do.
Sign into the same Apple ID on all of your Apple devices.
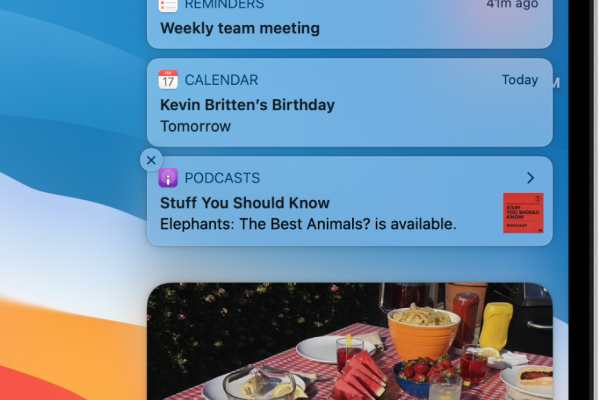
Get information at a glance
Your notifications and widgets appear in a single view in Notification Center, so you can easily see what your day has in store. You can also add the widgets you want, in three different sizes.
On your Mac, do any of the following:
-
Open Notification Center: Click the date and time in the menu bar, or swipe left with two fingers from the right edge of the trackpad.
-
Close Notification Center: Click anywhere on the desktop, click the date and time in the menu bar, or swipe right with two fingers toward the right edge of the trackpad.
Use notifications in Notification Center on your Mac
In Notification Center, move the pointer over a notification, then do any of the following:
-
Expand or collapse a stack of notifications: If an app’s notifications are grouped, multiple notifications are stacked. To expand the stack and see all of the notifications, click anywhere in the top notification. To collapse the stack, click Show less.
-
Take action: Click the action. For example, click Snooze in a notification from the Calendar app, or click Reply in a notification from the Mail app.
If an action has an arrow
next to it, click the arrow for more options. For example, to reply to a call using the Messages app, click the arrow next to Decline, then choose Reply with Message.
-
See more details: Click the notification to open the item in the app. If an arrow
is shown to the right of the app name, click the arrow to see details in the notification.
-
Change an app’s notification settings: If an arrow
is shown to the right of the app name, click the arrow, click the More button
, then choose an option:
-
Deliver Quietly: Notifications are not shown in the upper-right corner of the screen or on the lock screen (they are shown in Notification Center), and a sound is not played when you receive notifications.
-
Deliver Prominently: Notifications are shown in the upper-right corner of the screen and on the lock screen (and in Notification Center), and a sound is played when you receive notifications.
-
Turn Off: Notifications are not received. To turn on notifications again for the app, choose Apple menu
> System Preferences, click Notifications, select the app on the left, then click Allow Notifications on the right (blue indicates notifications are turned on).
-
Notification Preferences: Show the app’s notification settings in Notifications preferences.
-
-
Clear a single notification or all notifications in a stack: Click the Clear or Clear All button
.
Use widgets in Notification Center on your Mac
In Notification Center, do any of the following:
-
See more details: Click anywhere in a widget to open the related preferences, app, or webpage. For example, click anywhere in the Clock widget to open Date & Time preferences, or click anywhere in the Reminders widget to open the Reminders app.
-
Remove a widget: Press and hold the Option key while you move the pointer over the widget, then click the Remove button
.
Customize Notification Center on your Mac
-
On your Mac, open Notification Center, then click Edit Widgets at the bottom.
-
Do any of the following:
-
Find a widget: Use the search field to search for a widget, or click a category, such as Clock, to preview available widgets.
-
Add a widget: In the widget preview, click a size (if available), move the pointer over the widget in the preview, then click the Add button
. The widget’s added to the active widgets on the right.
-
Rearrange widgets: In the active widgets, drag a widget to a different location.
-
Edit a widget: In the active widgets, move the pointer over the widget (Edit Widget appears below its name), then click anywhere in the widget. The widget flips to reveal settings you can customize—for example, you can change the list shown in the Reminders widget. When you’re ready, click Done.
-
Resize a widget: In the active widgets, Control-click a widget, then choose a different size.
-
Remove an active widget: Move the pointer over an active widget, then click the Remove button
.
-
-
When you’re ready, click Done at the bottom of the active widgets.
Today View widgets show you current information from your favorite apps at a glance—today’s headlines, weather, calendar events, battery levels, and more. You can add these widgets to your Home Screen to keep this information at your fingertips.
Open Today View
Swipe right from the left edge of the Home Screen or the Lock Screen.
Keep Today View widgets on your Home Screen
You can keep Today View widgets on your Home Screen next to your apps when iPad is in landscape orientation.
-
With iPad in landscape orientation, open Today View from the Home Screen, then touch and hold the Home Screen background until the apps jiggle.
-
Turn on Keep On Home Screen, then tap Done.
Tip: A widget called a Smart Stack (one that has dots next to it) is a set of several widgets that uses information such as the time, your location, and activity to display the most relevant widget at the appropriate time in your day. You can swipe through a Smart Stack to see the widgets it contains.
Add widgets from the widget gallery
-
Open Today View, then touch and hold the Home Screen background until the apps begin to jiggle.
-
Tap
at the top of the screen to open the widget gallery.
Scroll or search to find the widget you want, tap it, then swipe through the size options.
The different sizes display different information.
When you see the size you want, tap Add Widget, then tap Done.
Tip: A widget called a Smart Stack (one that has dots next to it) is a set of several widgets that uses information such as the time, your location, and activity to display the most relevant widget at the appropriate time in your day. You can swipe through a Smart Stack to see the widgets it contains.
Remove or rearrange widgets
In landscape orientation, open Today View on the Home Screen.
Touch and hold the Home Screen background until the apps begin to jiggle, then do any of the following:
-
Remove a widget: Tap
on the widget, then tap Remove.
-
Rearrange the widgets: Drag a widget to a new location in Today View.
Edit a widget
You can customize most widgets so they display the information you want. For example, you can edit a Weather widget to display the forecast for your location or a different area. Or you can customize a Smart Stack to rotate automatically through its widgets based on things like your activity, the time of day, and so on.
On your Home Screen, touch and hold a widget to open a quick actions menu.
Tap Edit Widget if it appears (or Edit Stack, if it’s a Smart Stack), then choose options.
For example, for a Weather widget, you can tap Location, then select a location for your forecast.
For a Smart Stack, you can turn Smart Rotate off or on and reorder the widgets in the stack by dragging
next to them.
Tap the Home Screen background.
Remove Today View from your Home Screen
Touch and hold the Home Screen background until the apps jiggle.
Turn off Keep On Home Screen, then tap Done.
When you swipe left on your Home Screen, Today View will move off the screen.
Allow access to Today View when iPad is locked
Go to Settings
, then, depending on your model, tap one of the following:
-
Face ID & Passcode
-
Touch ID & Passcode
-
Passcode
Enter your passcode.
Turn on Today View (below Allow Access When Locked).
-

Note Taking
Take notes in all-new ways with your iPad and Apple Pencil!
To quickly open a note, wake iPad, then tap the Lock Screen with Apple Pencil. Tap to start writing or sketching. Make a mistake? To erase something you’ve written, just scribble over it. To erase something you’ve just drawn, tap
. As you work, you can reposition the toolbar by dragging it to any edge.
- 1. Once on the webpage or article you’d like to convert, tap the share sheet icon
- Scroll down the list of options to Markup, and select
- You may get a message that "The website did not finish loading" this is typically due to the website ads changing regularly. Just select continue
- The website image will be a new window where you can annotate right onto the website.
- Select done and choose where you would like to save the PDF.
The Apple pencil will allow you to handwrite into any area where text can be input.
- Simply start writing into the text box and the iPad will do the rest.
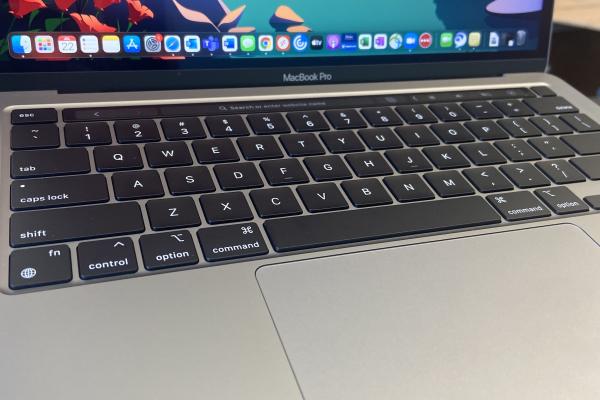
Keyboard shortcuts
Keyboard shortcuts are easy and help you get your job done faster. You can increase your productivity and accomplish more tasks by using the keyboard instead of a mouse.
Cut, copy, paste, and other common shortcuts
- Command-X: Cut the selected item and copy it to the Clipboard.
- Command-C: Copy the selected item to the Clipboard. This also works for files in the Finder.
- Command-V: Paste the contents of the Clipboard into the current document or app. This also works for files in the Finder.
- Command-Z: Undo the previous command. You can then press Shift-Command-Z to Redo, reversing the undo command. In some apps, you can undo and redo multiple commands.
- Command-A: Select All items.
- Command-F: Find items in a document or open a Find window.
- Command-G: Find Again: Find the next occurrence of the item previously found. To find the previous occurrence, press Shift-Command-G.
- Command-H: Hide the windows of the front app. To view the front app but hide all other apps, press Option-Command-H.
- Command-M: Minimize the front window to the Dock. To minimize all windows of the front app, press Option-Command-M.
- Command-O: Open the selected item, or open a dialog to select a file to open.
- Command-P: Print the current document.
- Command-S: Save the current document.
- Command-T: Open a new tab.
- Command-W: Close the front window. To close all windows of the app, press Option-Command-W.
- Option-Command-Esc: Force quit an app.
- Command–Space bar: Show or hide the Spotlight search field. To perform a Spotlight search from a Finder window, press Command–Option–Space bar. (If you use multiple input sources to type in different languages, these shortcuts change input sources instead of showing Spotlight. Learn how to change a conflicting keyboard shortcut.)
- Control–Command–Space bar: Show the Character Viewer, from which you can choose emoji and other symbols.
- Control-Command-F: Use the app in full screen, if supported by the app.
- Command-Tab: Switch to the next most recently used app among your open apps.
- Shift-Command-5: In macOS Mojave or later, take a screenshot or make a screen recording. Or use Shift-Command-3 or Shift-Command-4 for screenshots. Learn more about screenshots.
- Shift-Command-N: Create a new folder in the Finder.
- Command-Comma (,): Open preferences for the front app.
There are many other app specific shortcuts too. Visit here to for more https://support.apple.com/en-us/102650
Use common keyboard shortcuts
Most iPad keyboard shortcuts use the Command ⌘ key, like on a Mac. If you're more familiar with a PC keyboard, the Command ⌘ key does the same thing as the Control key on a PC.
Here are some common keyboard shortcuts:
- Command-H: Go to the Home screen.
- Command-Space bar: Show or hide the Search field.
- Command-Tab: Switch to the next most recently used app among your open apps.
- Command-Shift-3: Take a screenshot.
- Command-Shift-4: Take a screenshot and immediately open Markup to view or edit it.
- Command-Option-D: Show or hide the Dock.
Want to add an emoji? To quickly find the emoji keyboard, press the globe key when you're in a text field. Don't see the emoji keyboard? Make sure that it's turned on.
Customize keyboard shortcuts
- Open Settings, then tap Accessibility.
- Tap Keyboards.
- Tap Full Keyboard Access and turn it on.
- Tap Commands.
- Tap a command, then press a custom key combination to assign to it.
- Tap Done.
Split-View
Use split-view on either your iPad or MacBook to easily take notes during a Zoom meeting, make notes while reading an article, or watch a movie while pretending to pay attention to a lecture.
- Hover your pointer over the full-screen button
in the upper-left corner of a window. Or click and hold the button.
- Choose ”Tile Window to Left of Screen” or ”Tile Window to Right of Screen” from the menu. The window then fills that side of the screen.
- Then click a window on the other side of the screen to begin using both windows side by side.
How to use Slide Over:
- Open an app.
- Swipe up from the bottom of the screen to open the Dock.
- On the Dock, touch and hold the second app that you want to open, then drag it to the screen.
How to use Split View:
- Open an app.
- Swipe up from the bottom of the screen to open the Dock.
- On the Dock, touch and hold the second app that you want to open, then drag it off the dock to the left or right edge of the screen.