There is an abundance of resources and information available to users in the Med School’s network environment! We realize that our students will have questions regarding the services we offer and how to use them. If you’re here because you are experiencing trouble or curious to learn more about some of our most frequently utilized services, please explore the content on this page – you may find the solution you are looking for.
As always, if you require assistance, please reach out to the helpdesk by phone at 919-668-6212 or by email at mededit_helpdesk@duke.edu.
There are two things you'll want to do in order to get your new cell phone set up with Duke's systems.
1) Re-Enroll in Duo for MFA using the instructions found here https://oit.duke.edu/help/articles/kb0036398/
2) You will need to enroll the phone in Duke’s MDM to access email, Epic and Microsoft apps like Outlook, Teams etc. To enroll the phone, follow the instructions here:https://duke.is/dhmdm
Duke’s Mobile Device Manager (MDM) is an endpoint management system in which users can enroll their personal smart devices. Enrolling in the MDM system will allow you to connect to Duke’s secure networks with your personal device while on campus and in the hospital.
Enrolling will also allow users to receive Duke email on their phones, to access secure software resources like Epic Haiku, Canto, and more – directly from the user’s enrolled device.
To learn more about Duke Health’s Mobile Device Manager, click the button below:
To enroll your device, click below:
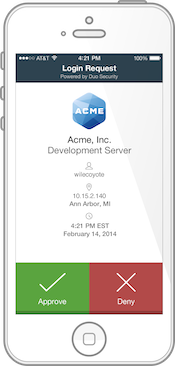
MFA boosts digital and data security in that it requires more than just a password when a user endeavors to access a resource. It works by having a user authenticate their log-in credentials through a second device (smartphone, tablet) belonging to the user. It is meant to verify user credentials used to log in to a resource that actually belongs to that user!
Setting up MFA will require you to download the Duo Mobile app from your relevant App Store. Once installed on your device and your phone registered, Duo Mobile generates a security key or approves a log-in request via push notification. Alternatively, users may opt to have a code sent to their smartphone via SMS or receive a phone call to authenticate if Duo Mobile is not set up or is functioning properly.
Click below to learn more and enroll in MFA:
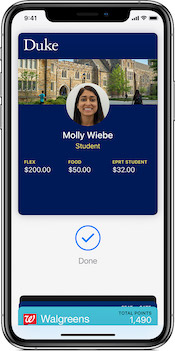
You can now access your DukeCard right from the Wallet app on your iPhone or Apple Watch! Once set up, you can hold your device near the card reader on our ePrint printers in TSCHE. You can also use it to get into the gym, pay for food and other items with your FLEX funds on the main campus, and access other buildings and spaces after hours.*
*Unfortunately, the hospital side has not implemented the new scanners, so you won’t be able to use this feature in the hospital or clinics.
To configure your device for mobile Epic access from your smartphone or tablet, you must enroll the device in Duke’s Mobile Device Management (MDM) system. Instructions for enrollment are here:

To access Epic/Maestro Care from your computer, you don't need to connect to the Duke Med VPN. Citrix is its own secure computing environment that allows you to access patient records and other information. Sign-in instructions for both Mac and PC users are found below:
In a Browser
- Go to citrix.duke.edu.
- If prompted, log in to the Duke Shib with NetID and NetID password and then authenticate.
- If prompted, click ‘Detect Citrix Workspace App’. Then click ‘Already Installed’.
- Once at the Citrix Dashboard, find and click the Maestro Care icon. As the Citrix Dashboard loads, an .ica file is automatically downloaded to your Downloads folder. Open the file to launch Epic.
- At the Epic log-in screen, enter your NetID and NetID password.
*Requires Citrix Workspace. This should already be installed on your Duke issued laptop. If not, open the Self Service App to install.
If you need to reactivate your Spok account or need information about your pager number just fill out this form at https://duke.is/spokrequest.
Once completed someone will reach out to help.

Our Mac management software has its own app called Self Service. Think of it as an Apple App Store. Here, you will find other apps we make available to the class. There are also handy bookmarks for getting IT help, updating ePrint funds, acquiring Adobe products for free, enrolling your mobile device(s) in the Duke Mobile Device Manager system (MDM), and more.
- Adobe
Adobe Acrobat Express: Request access through Software Manager.
Adobe Creative Cloud Apps: Submit the Adobe CC Apps – Students request form for access to desktop applications.
- Notability
Notability is a powerful yet wonderfully simple note-taking and PDF annotation application for iOS and Mac devices. Notability has an Annual Subscription $14.99 from the App Store. Explore its features, download, and get started with Notability by clicking below:
We store priceless information on our machines and rely on them to keep our data safe. Anything can happen, though, which is why we highly recommend maintaining a current backup of everything.
It is critical that you back up your data regularly. Hardware can be replaced, your data cannot!
Backing Up Your Mac![]()
Your Mac should be set to automatically backup your Documents and Desktop folders to Duke's OneDrive. If it's not, then follow these instructions to enable:
- Open OneDrive by searching for it or opening the Launchpad and clicking it.
- Sign in with your NetID email .i.e. NetID@duke.edu
- Shib login will open up for you to sign in with your NetID and password.
- *OneDrive may restart and install updates. This can take a few moments.
- Click on the cloud icon on the top of your screen and open Preferences by clicking the gear icon.
- Start backup by going to the Backup>ManageBackup>StartBackup
*OneDrive doesn't back up your photos**
- Complete PRCC Training for Duke Employees and Affiliates in LMS
- Submit PRCC Account Request
- Choose an option should be Request SOM Student Access to PRCC
While on campus at the Med School, will use the Wi-Fi network called ‘DH1’. This is the encrypted WiFi network for Duke Health. If you connect to a network other than DH1 while on campus, you may not have access to resources like Duke Health Resources.
MacBooks will automatically connect to this network when in range.
Mobile Phones: Will automatically connect to aces when enrolled in the Duke MDM system. Visit duke.is/dhmdm for more information.
Duke Medicine has its own VPN that is separate from the University VPN system. Any students wishing to access patient data systems away from Duke Campus must be connected through the Duke Med VPN to do so.
How Do I Access Duke Med VPN for off-campus use?
To connect to Duke Med VPN:
a) Open the Cisco Secure Client app on your computer. The connection window address field should be pre-populated with Duke Med VPN or vpn.duhs.duke.edu. If not, type the address and then click ‘Connect’.
b) In the Password field, enter your NetID password.
c) In the MFA Option/Second Password field type 'push' – this will send a push notification to your device – which you must approve via the Duo Mobile app. Make sure you have Notifications enabled for the Duo app.
d) Once you approve the notification, the VPN system should initiate and establish a connection (a green padlock icon will appear on the Cisco AnyConnect icon).

Duke uses a system called ePrint, which is already installed on your laptop. There are three ePrint stations in the Trent Semans Building, two in the Medical Center Library, and many others are available across campus. Each semester, you are allocated $20 in black and white print funds. If your account gets low and you need additional funds, check the link in Self Service > Bookmarks to replenish your account.
To print in black and white, select ‘ePrint_OIT’. When you wish to print a document through ePrint, you will be prompted for your NetID. Type it and press Enter. Then, at a print station, swipe your DukeCard to pay for your print job.
The closest color printer stations are in the Medical Center Library. The Medical Center Library has a color printer on floor 2R and on floor 1 in the Book Collection room. To color print, first, ensure that you have added funds to your DukeCard FLEX account. You won't be able to color print with standard print funds allocated to your DukeCard. You can add funds or check your FLEX account status by signing in with your NetID and NetID password here:
*If this is your first time printing to the Medical Center color printers you will need to install the driver. To do this open the Self Service app on your Mac and install the ePrint Color - Mudd Library.
When you are ready to color print, select 'ePrint Color Mudd Library'.
Then go to the printer you want to use and swipe your Duke Badge. Your print Que should be displayed on the screen. Check off the prints you want and press print at bottom of the screen.
To view a map of printers near your current location, click the button below:
If you would like to set up Mobile contactless printing use the link below for instructions.
OneDrive:
We strongly recommend automatically backing up your important files in the cloud using Microsoft OneDrive. If your computer is lost, stolen, or damaged, cloud storage may be the only way to recover your data.
Duke provides 1 TB of OneDrive storage.
Set up the OneDrive app (Mac):
- Open OneDrive by searching or by finding it in your Applications folder.
- In the OneDrive window, enter your NetID@duke.edu and click ‘Sign In’.
- In the Your OneDrive Folder window, click ‘Next’ to accept the default location for your OneDrive folder. Click through the other windows to finish the setup.
Once set up, OneDrive will automatically back up your Desktop and Documents folders.
Note: Files stored in other locations (such as Downloads) will not be automatically backed up.
To access OneDrive via a web browser (Mac or PC):
- Navigate to Onedrive.com
- Click "Sign in", enter your NetID@duke.edu, then sign into shib with NetID and Password
Tip: Use the web version to verify files have been backed up or to access files from another device.
Box Drive:
Box is another cloud storage service. It is best suited for files you need to share and collaborate on with others. Duke gives you 50GB of storage here.
If you are working on research projects and need to share many files, we recommend setting up a Box “Kit.” Contact us for assistance with setup.
Set up Box app (Mac):

- Open Box on your computer.
- Enter your NetID@duke.edu at the Box log-in window. Click 'Next'.
- In the Duke Shibboleth log-in window, sign in with your NetID and NetID password.
Once logged in for the first time, Box creates a folder directly on the Desktop that makes creating, storing, and accessing files quick and easy.
You can also sign in to Box through a web browser:
- Open a web browser.
- Navigate to box.duke.edu.
- Click the yellow 'Log In' button. When asked, 'Part of Duke?', click 'Continue'.
- Sign in at the Shibboleth Log In window with your NetID and NetID password.
Once logged in, you will see the same files as in your desktop Box folder.
Changes made in the web version (adding or removing files) will automatically sync with your desktop—and vice versa.
Account Self-Service is a set of tools provided by Duke OIT for managing your Duke Account. Change your NetID password, set up Multi-Factor Authentication and register your mobile device, manage your Duke Email and more are available by clicking below:
A virtual machine is essentially a computer within a computer. It will allow users to run operating systems and software on their computers that are non-native, or incompatible, with their computer system. Operating systems and software hosted and offered virtually means that users can access these tools without the need to physically install them on their computers.
Duke OIT provides a service called Virtual Computing Manager that allows Duke community members to reserve virtual machines, access specialized software, or even host their own servers for projects and coursework. To find out more or to make a reservation, click the button below:
*No work with PHI should be performed on a VM*
The Helpdesk team also has an assortment of equipment available to students of the Duke School of Medicine community, including
- Mac Laptops
- Windows Laptops
- Laptop Chargers
- iPad/iPhone Chargers
- Headphones
- External Hard Drive
Contact us at mededit_helpdesk@duke.edu to request a loaner.
Please Note: The loaner program is a service provided to Duke SOM students for School of Medicine (UGME)-related purposes only. The equipment becomes the individual's responsibility at the time of check-out until the equipment is returned to us.
The Multimedia team has an assortment of loaner equipment to suit your needs as a student, faculty, or staff member of the Duke School of Medicine community, including:
- Windows Laptops
- Mac Laptops
- Cameras
- Microphones
- Wacom Tablet
- A/V cables: HDMI, VGA, audio
Need a loaner? Please contact a member of the multimedia team at mededit_av@duke.edu to discuss availability and options.
Please Note: The loaner program is a service provided to Duke SOM faculty, staff, and students for School of Medicine (UGME)-related purposes only. The equipment becomes the individual's responsibility at the time of check-out until the equipment is returned to us.
If one of your Duke Provided electronics is not working correctly, please contact MedEdIT before bringing it to anyone else for repair. The MedEdIT team can not only repair the item but can provide you a loaner to use in the meantime. In addition, we can make sure that the repair doesn’t affect your ability to access Duke resources like Epic and email.
Before bringing it into the MedEdIT team, be sure to back-up your computer and put anything you’ll need access to into Box or OneDrive for easy retrieval on the loaner.
You can access secure WiFi even while traveling to other university campuses globally.
Duke students, faculty and staff can access the eduroam (education roaming) service to securely access the Internet when visiting other participating institutions worldwide.
For more information, click here https://oit.duke.edu/what-we-do/applications/eduroam
These devices are great for entertainment when you need a break. Here is a link to some fun things you can do with your device.